Free Motion Frenzy 2021
My mostly quilted quilt!
In 2021, as the Great Pandemic continued, I took some really big classes, all related to quilting. The one I’m covering in this blogpost is Free Motion Frenzy 2021 by Karlee Porter, also called FMF2021. As you might guess from the class name, Free Motion quilting was the class focus! I loved the Graffiti Quilting class I took with Karlee in 2020, so I was excited when she offered up another class, this time teaching free motion designs to quilt over classic quilt blocks.
Whole Cloth Quilt
One of the primary draws for me with Karlee’s FMF2021 class (other than Karlee herself!) is that the class fee included one of her pre-printed quilt tops, the Ultimate Sampler, and students even got to choose a colorway for their quilt top. These are called whole cloth quilt tops, because the designs are printed rather than pieced - so a whole piece of cloth printed with the block designs rather than fabric cut into shaped pieces and sewn together in block patterns. Since I knew the free motion quilting skills would already be a big learning curve, it was a relief to not have to also be learning to piece at the same time for this class. Each student having the same sampler whole cloth quilt made for a nice curriculum flow, as Karlee presented multiple blocks from her quilt top and her suggested quilting designs for them in each class. She provided downloads of the block designs so we could practice our drawing skills either digitally in a drawing app or we could print the designs on paper if we wanted to practice with pencil or pen. Not only does Karlee share her design ideas, most crucially she walks you through where to start, how to move through the design, and where to end it. She also suggests ways you can improvise!
Quilt Supplies
Once I had my quilt top in hand, I went to The Presser Foot in Longmont, Colorado for help with the rest of my supplies. After getting advice from one of their experts about the different types of batting I could use, I decided to try a wool batting so I could end up with more puff to my raised areas in between the quilt stitching. I chose a 108-inch wide flannel backing, mainly for the gold-tan color, and two different threads: a golden-color 40wt polyester Isacord thread for my top thread color, and a gold-brown variegated 40wt polyester Isacord for my bobbin thread. I love the top color with the quilt top colorway that I chose. I’m not as thrilled with the way the variegated thread looks on the underside, but I decided to just stick with it so the quilting looks consistent. Next project I’ll choose a solid color for my bobbin thread. This thread is usually used with machine embroidery, but I also love to use it for regular sewing and now for quilting. It’s sturdy enough to stand up to the intense stitching process, and it has so many color choices. I used Titanium Organ brand needles.

My gold top thread and my bobbin variegated thread.
View of wool batting pinned to top with basting pins, and some initial quilting.
Quilting Equipment
Many students of this class have dedicated quilting machines. I used a domestic sewing machine (meaning, a regular sewing machine - my beloved Bernina!) with my feed dogs lowered and using special presser feet. What I ended up using the most was my Bernina stitch regular foot. I did try some other quilt-specific presser feet, but with a quilt of that size and all its layers, I found myself getting very tired, and the stitch regulator really took a huge amount of strain off of my hands and arms and shoulders. I don’t have a special sewing cabinet that lowers the machine’s stitch plate to be level with my table, so I have to work with my arms already a bit elevated, and it’s just a more tiring position to work from for such intensive stitching. The stitch regulator foot was a significant help with my comfort and thus also my stamina. I’m still practicing on moving the fabric smoothly to get the even stitches we all strive to achieve, but I think was able to get more even stitches with this foot than with some of the others I tried.
Doing the Work
This course took place over a couple of months, via Facebook Live classes which were also recorded for later viewing if you couldn’t make the live class or wanted to re-watch any of it. I think I did a pretty good job of keeping up! I did not completely finish, but I am very close. The last quilting step I have is to finish out the border area. After that I’ll need to trim up the layers and then add a binding. After that I’ll run it through the wash on a gentle cycle to really puff up the batting. Since taking the FMF2021 class I’ve also practiced more line art and might incorporate some of that into my border stitching. By now I’ve gotten a better feel for the free motion stitching, with plenty of room to improve, so I’m looking forward to finishing the rest of the border when I can dedicate several days in a row to finish the quilting all at once. I am really glad I took this class! The free motion quilt technique is a fun way to add line art into a quilt, and make something more personal.

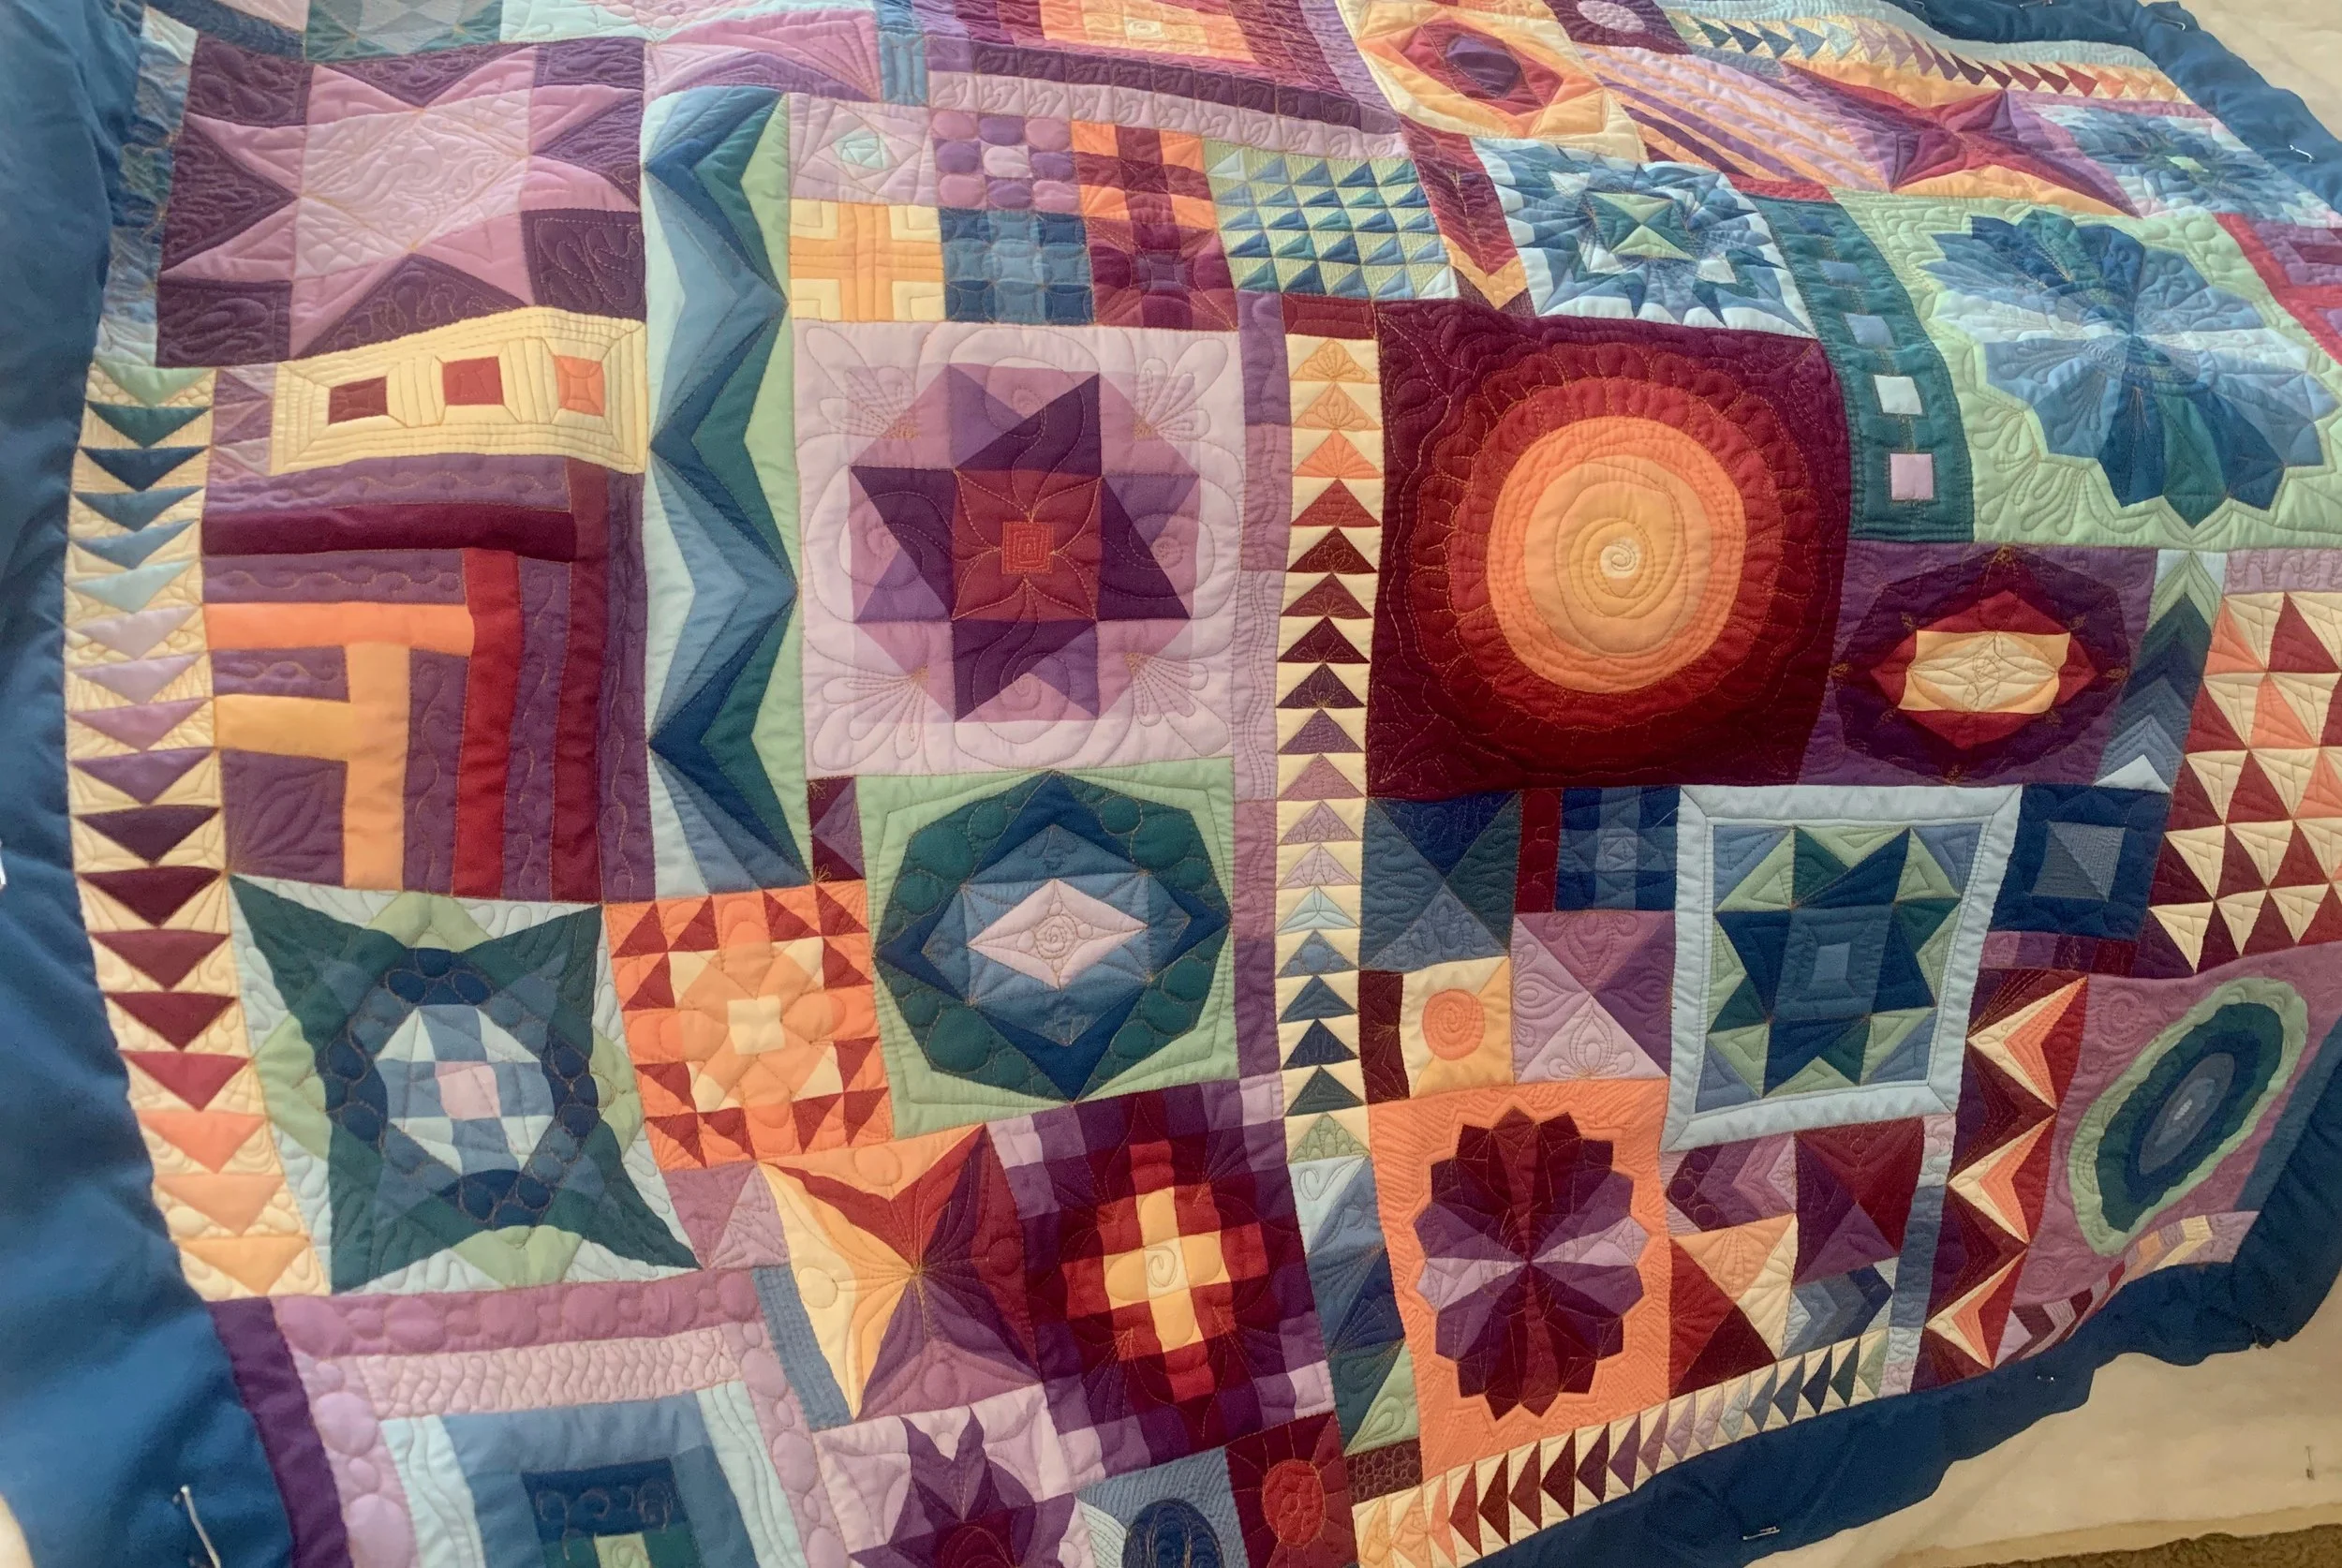
A closeup section of my quilting on Karlee’s Ultimate Sampler top.