Karlee Porter’s Shimmering Symphony Class
In early 2021 I took another super-fun class with Karlee Porter, which was her Shimmering Symphony master class. In this course she taught us how to make a copy (our own version) of her award-winning Shimmering Symphony art quilt. We used free-motion quilting, couching, bobbin work, and Swarovski hot crystals.
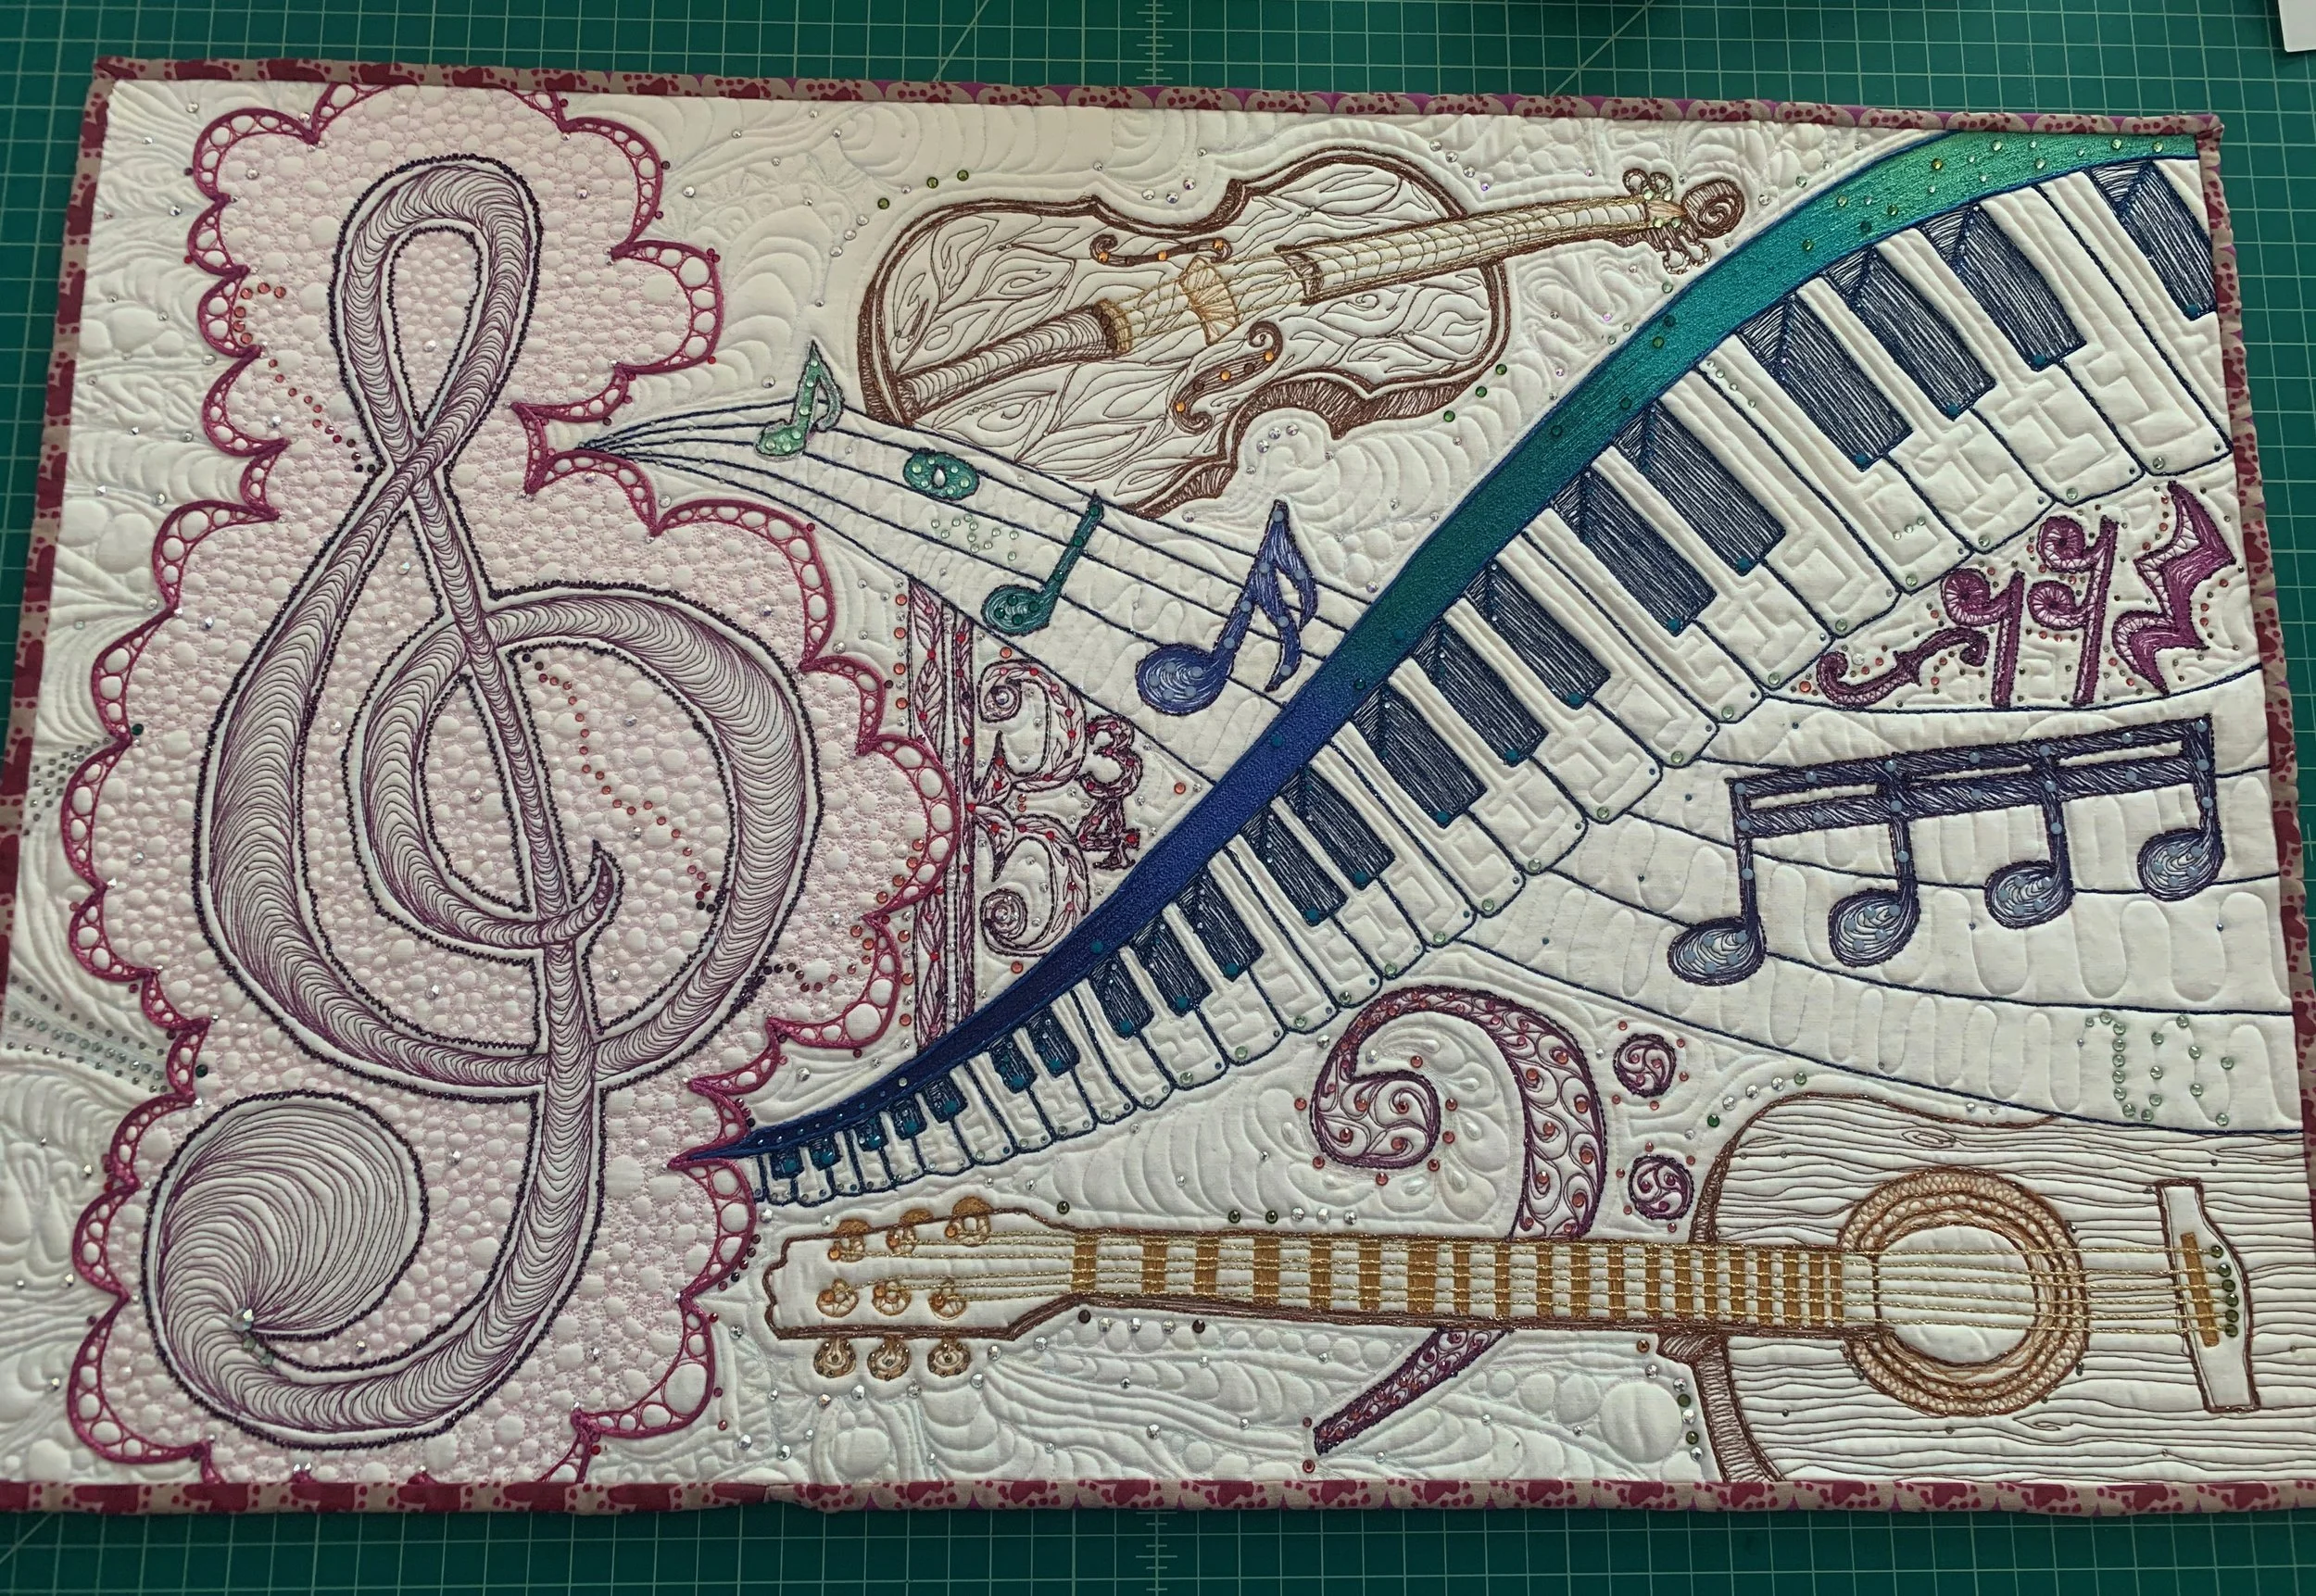
The completed and bound quilt!
Beginning the Quilt
As part of the 2021 class lessons, Karlee sent a paper outline drawing of her art so that we could transfer it to our fabric. In her live class sessions (which she also recorded for later viewing) Karlee showed us a couple of different methods to transfer the art.
The next step she had us do after the initial transfer was to stitch out the initial outlines, which served both as a basting step (keeping the quilt layers together) and as a way to plan out the rest of the art.
In the picture below you can see the basting pins I started with and also the remnants of my first drawing attempt with chalk. I soon switched to a Frixion pen because it didn’t tug as much on the fabric and I knew would be easier to remove later. (A couple of passes with a hot iron, and the ink turns invisible!) The initial stitching was done in the colors we chose for each instrument.
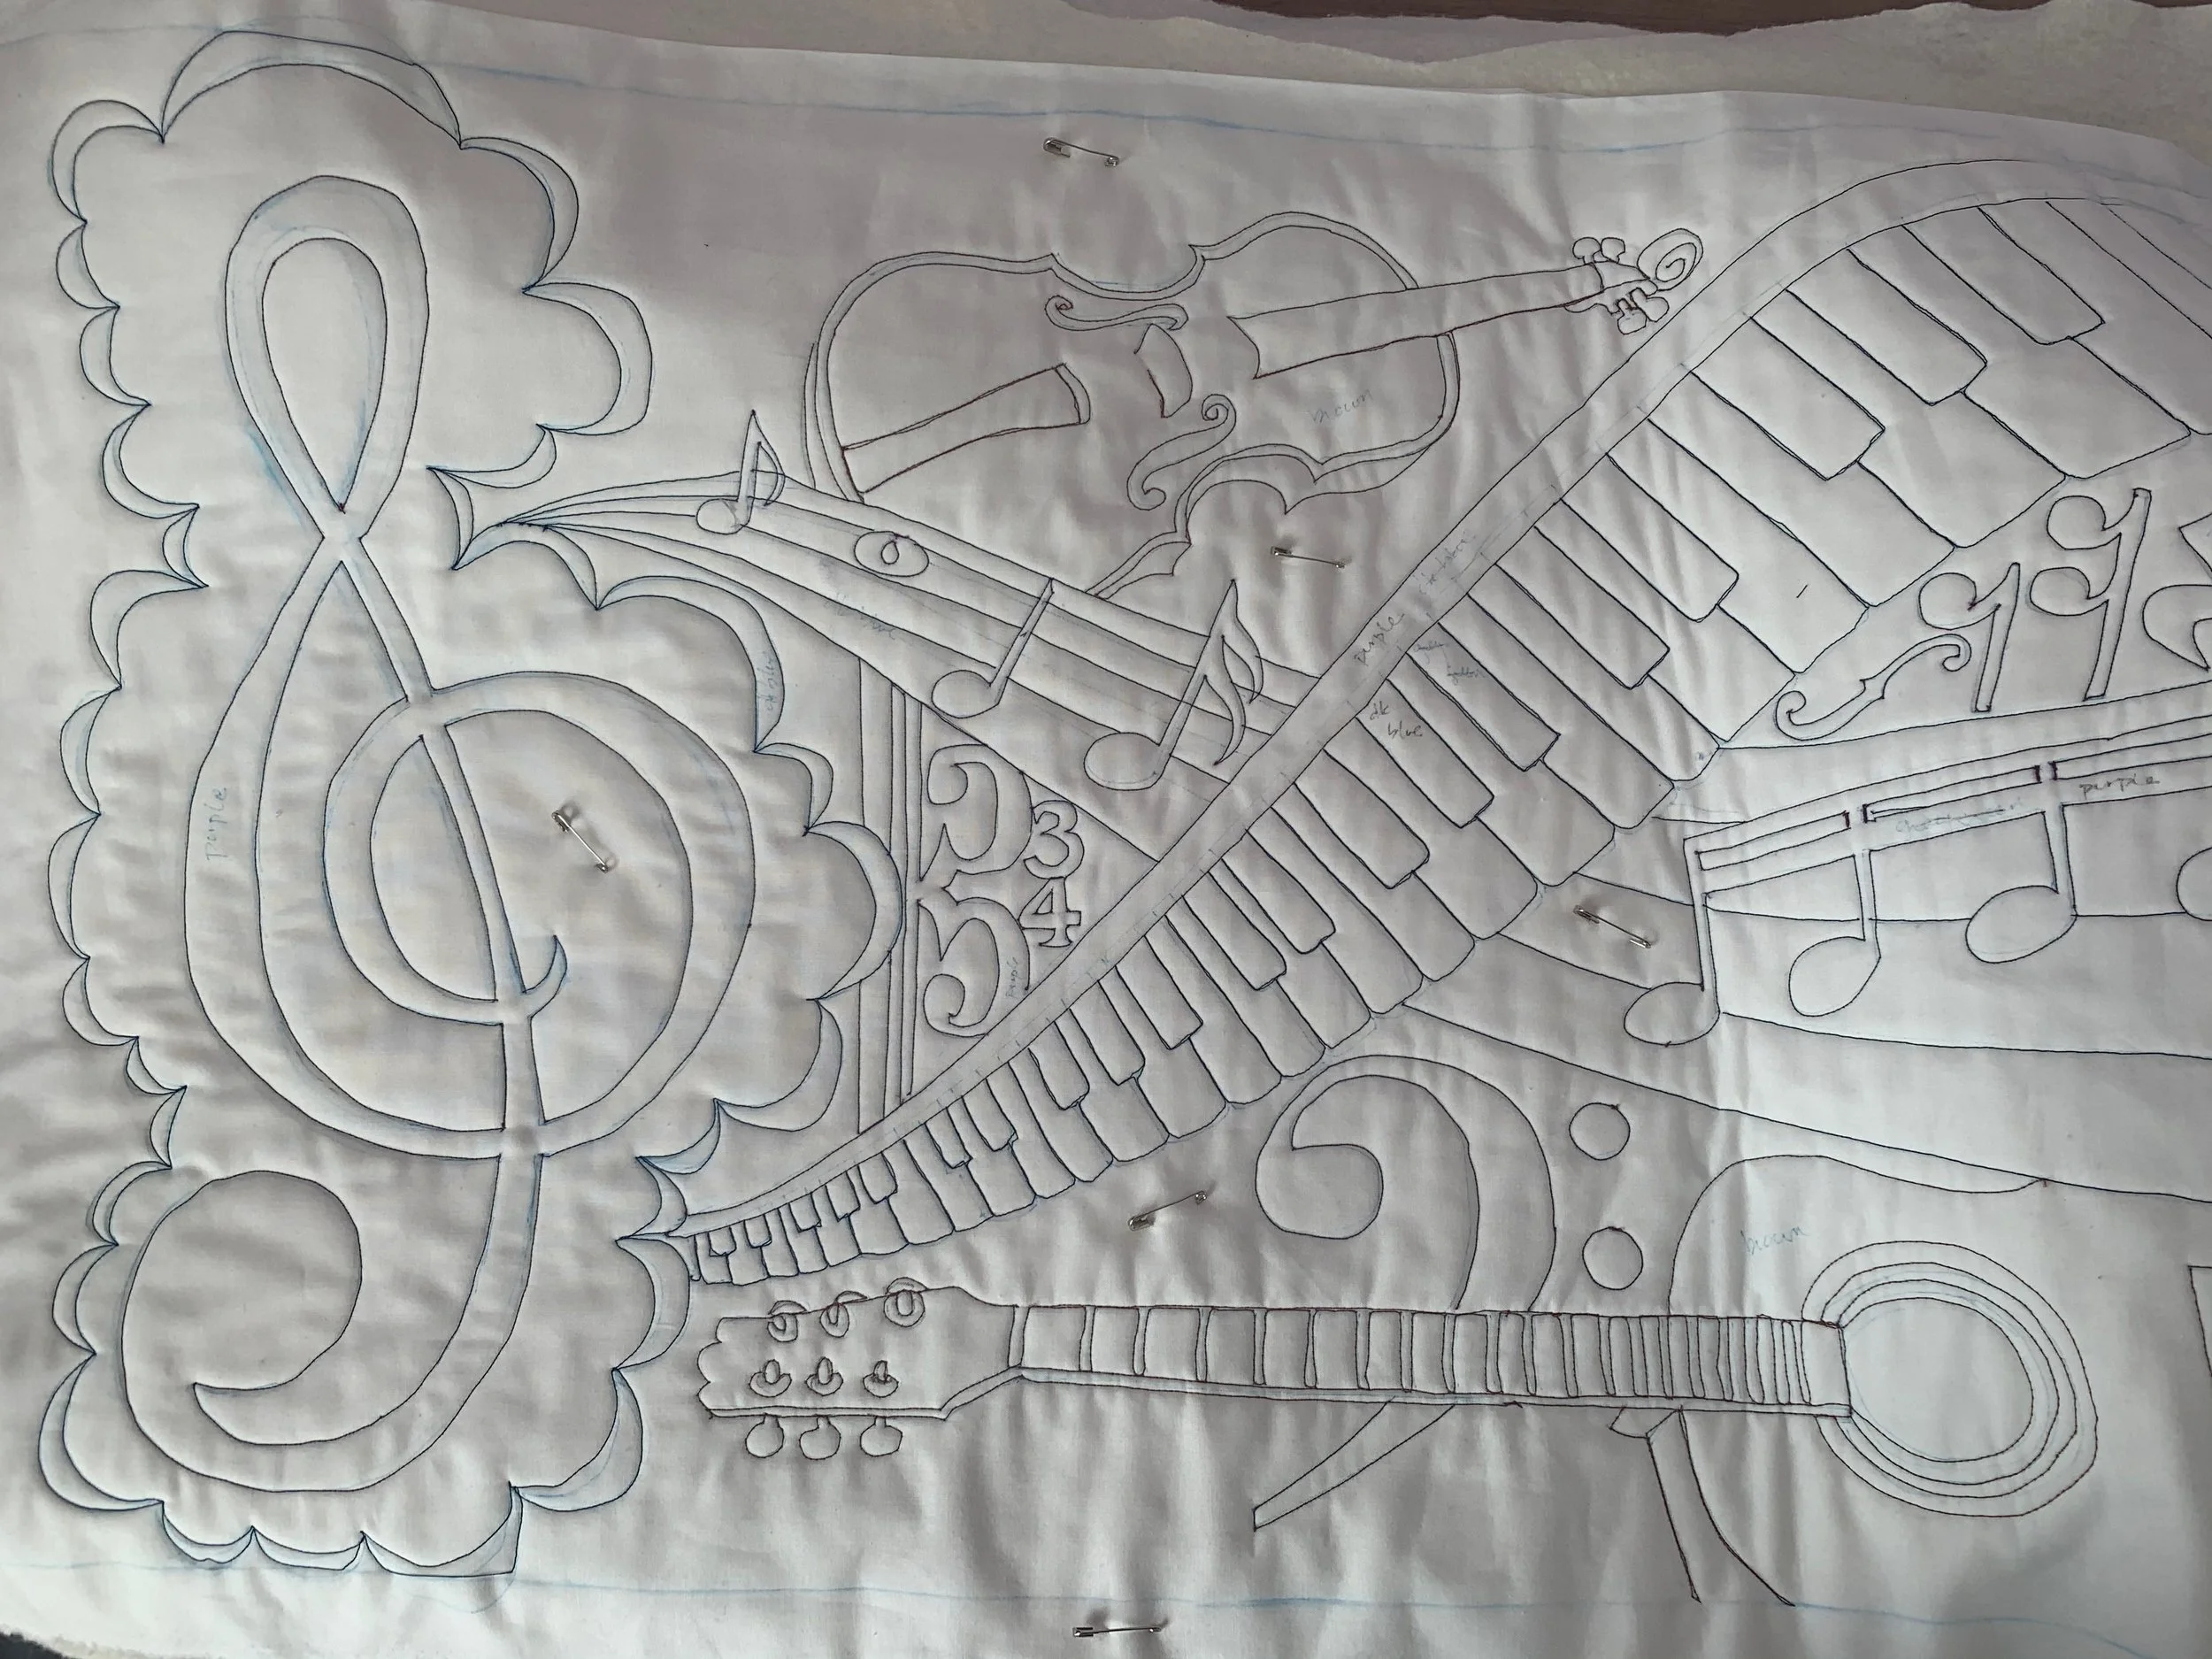
The initial stitch out of the art composition.
Filling It In
Once we had our initial shapes stitched on to our quilt sandwiches, Karlee started walking us through the fills (the free-motion quilt stitching) for each part of the quilt.

Quilt fills for the music note.
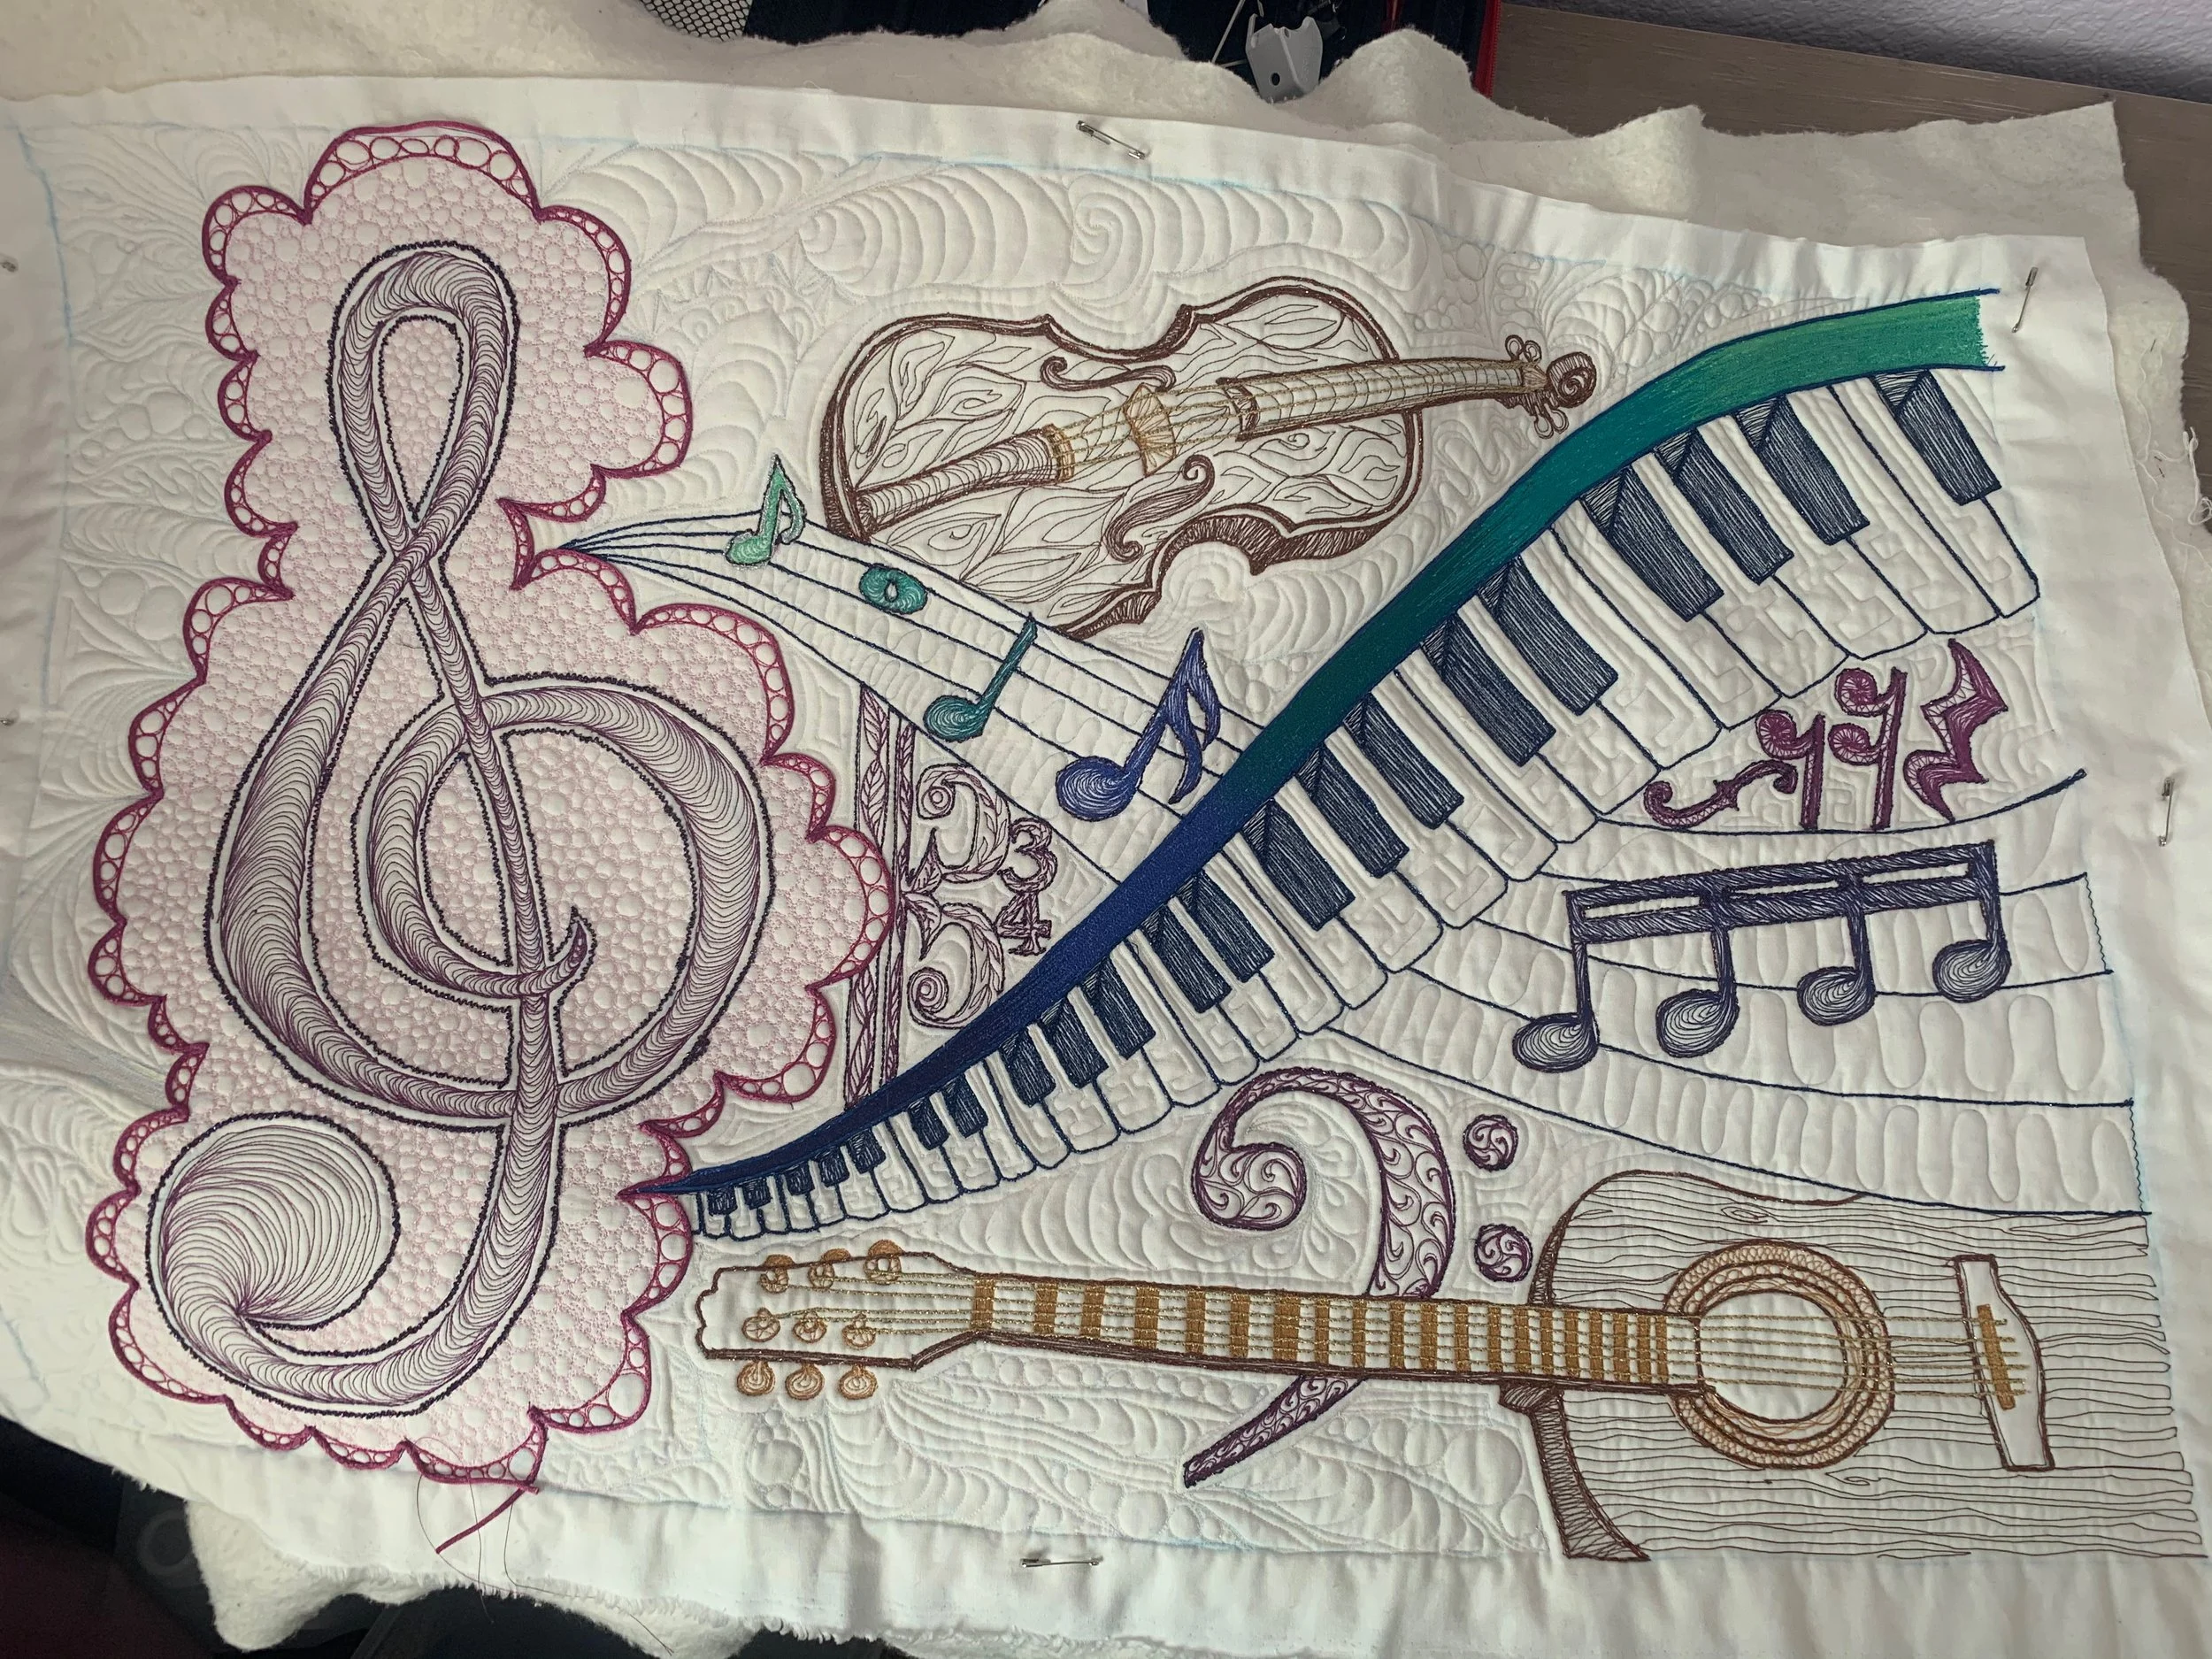
More fills, and some thread painting on the keyboard.
Bling!!
After we got our fills completed, Karlee taught us how to play with the bling!
We learned about bobbin work - this is when you put a decorative, usually heavy, thread or cording in your bobbin, and you then stitch with your work face down so that the bobbin thread shows up on the top surface. It requires that you adjust the tension for your bobbin case (or get a second bobbin case that you adjust for bobbin work).
We learned about applying cording - this is when you thread a decorative cord through your presser foot while you stitch, using a zig-zag stitch to fasten down your cording.
And, we learned about applying hot crystals! This is using crystals that have an adhesive already applied, and you activate the adhesive with a hot applicator made especially for crystal work.
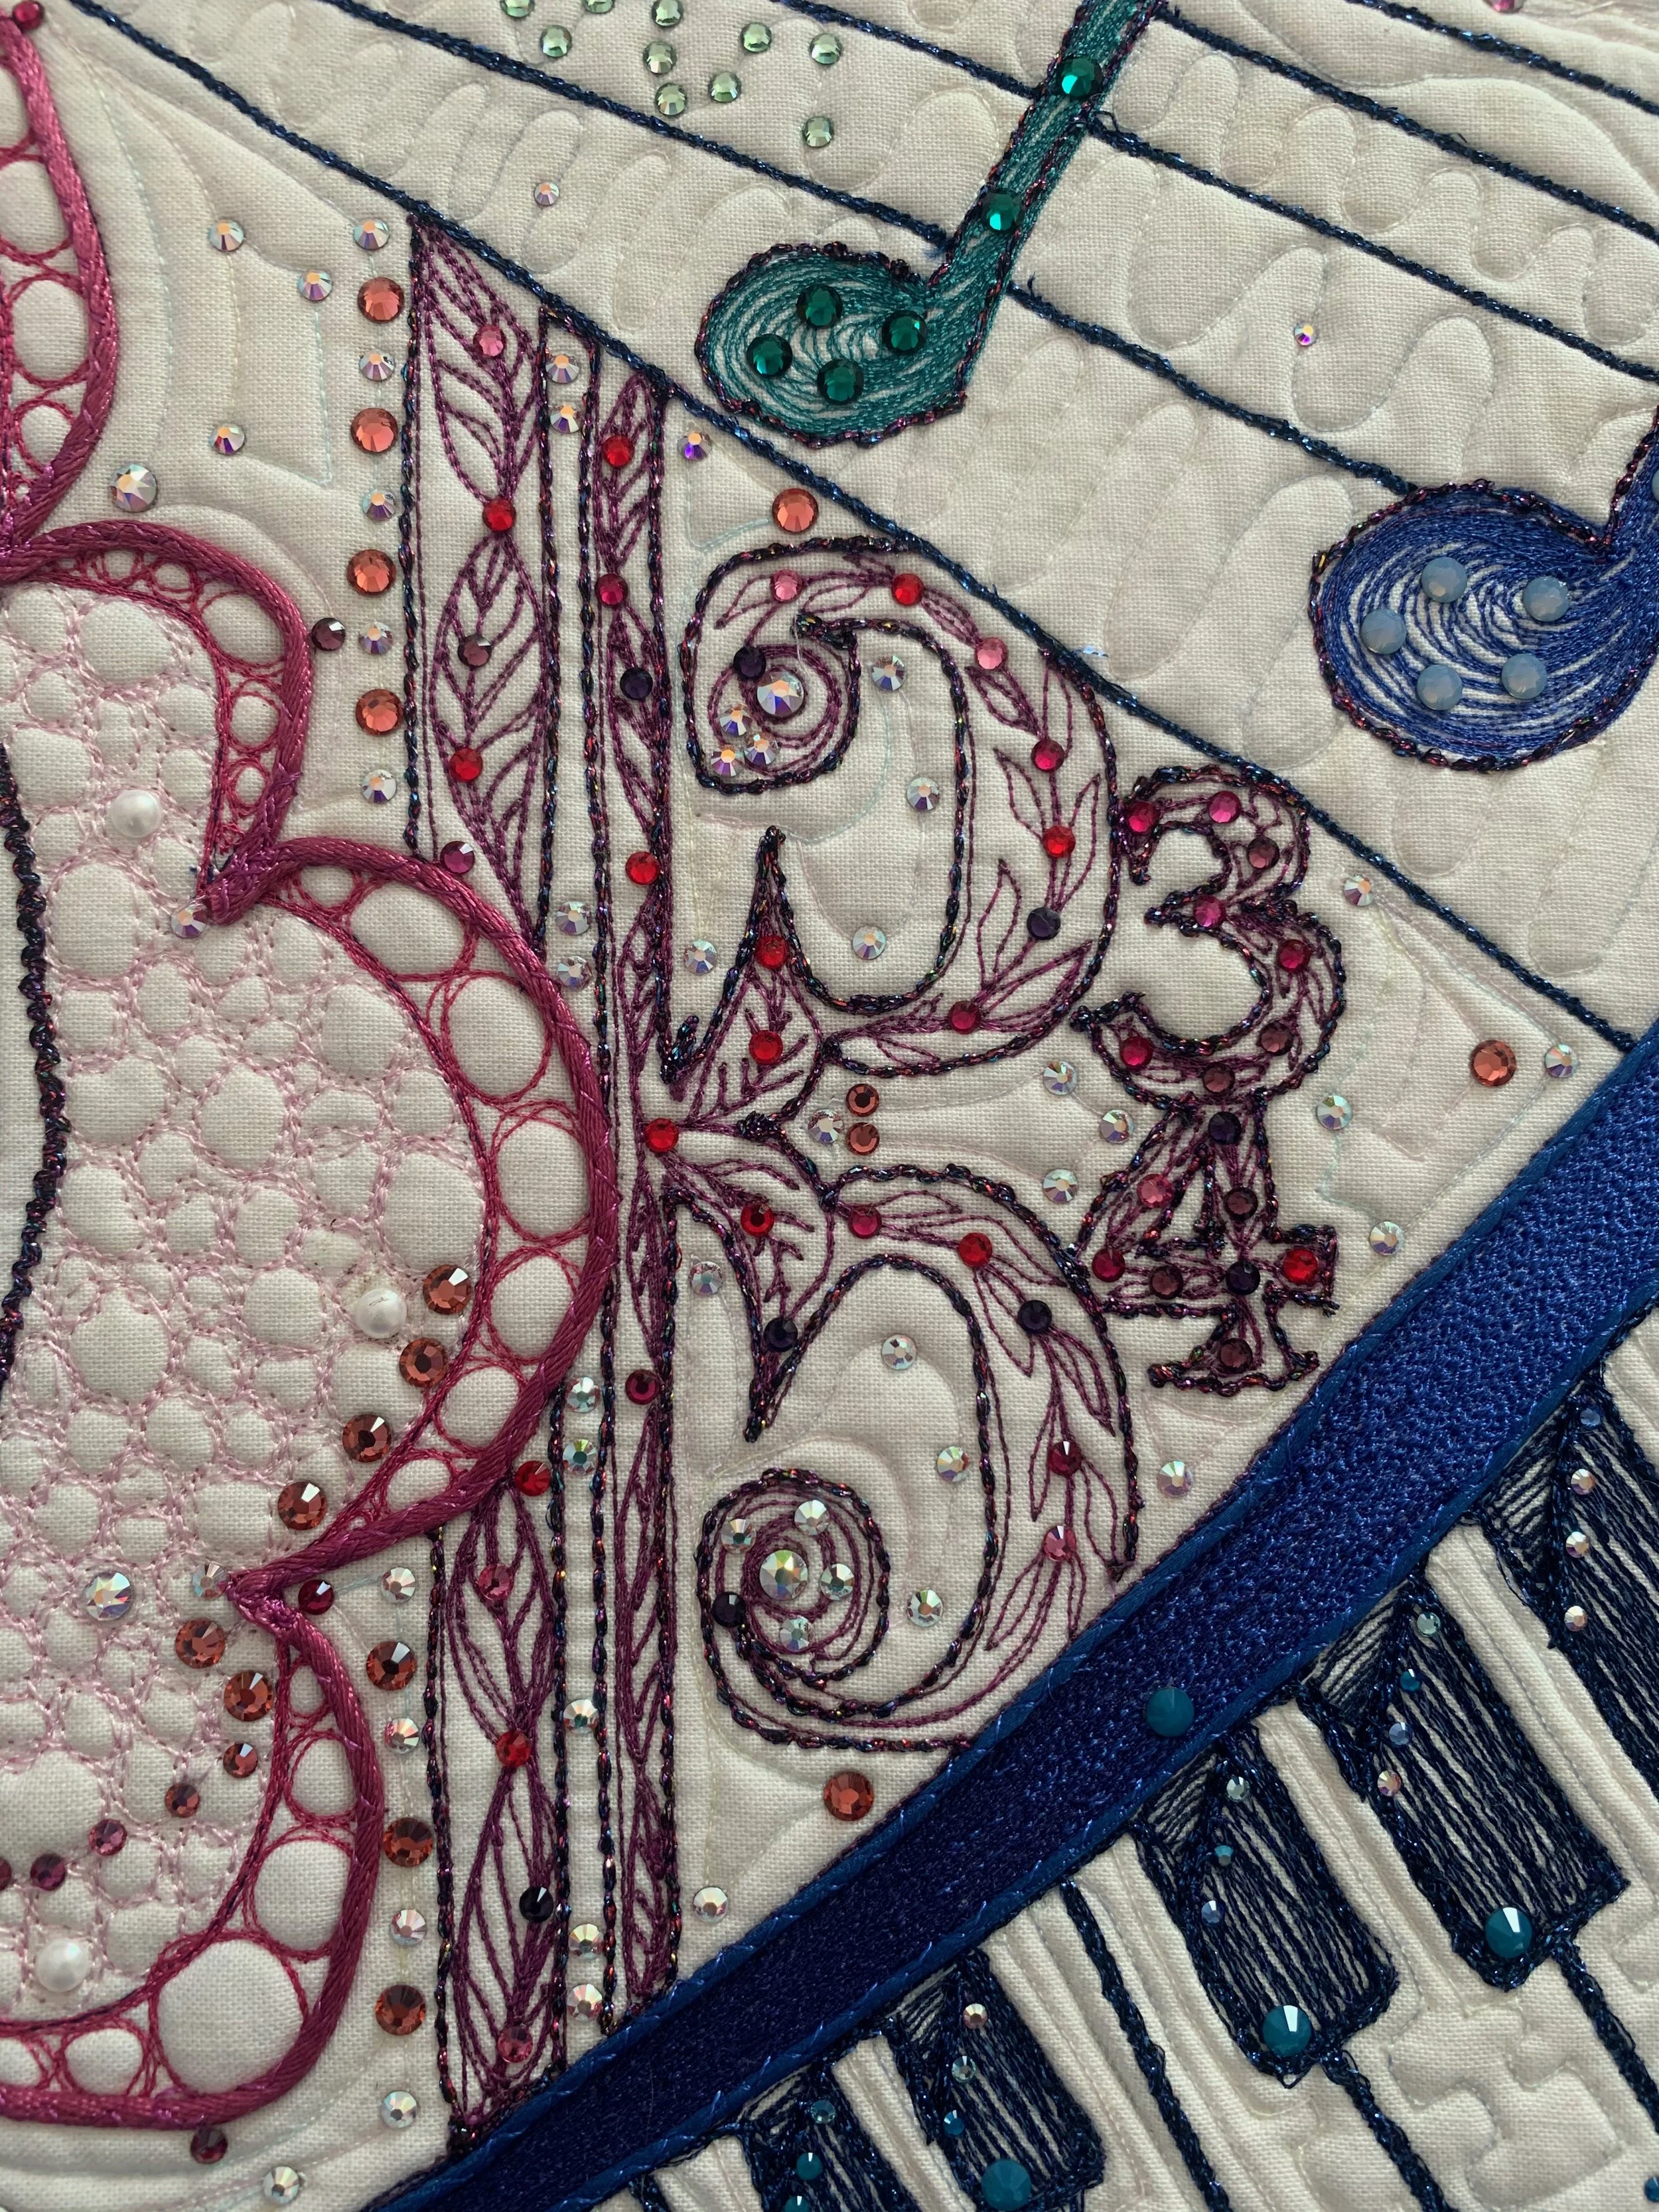
Bobbin-work in the heavy, dark, sparkly thread. Cording in the large pink and small blue satin cords, and crystal work!
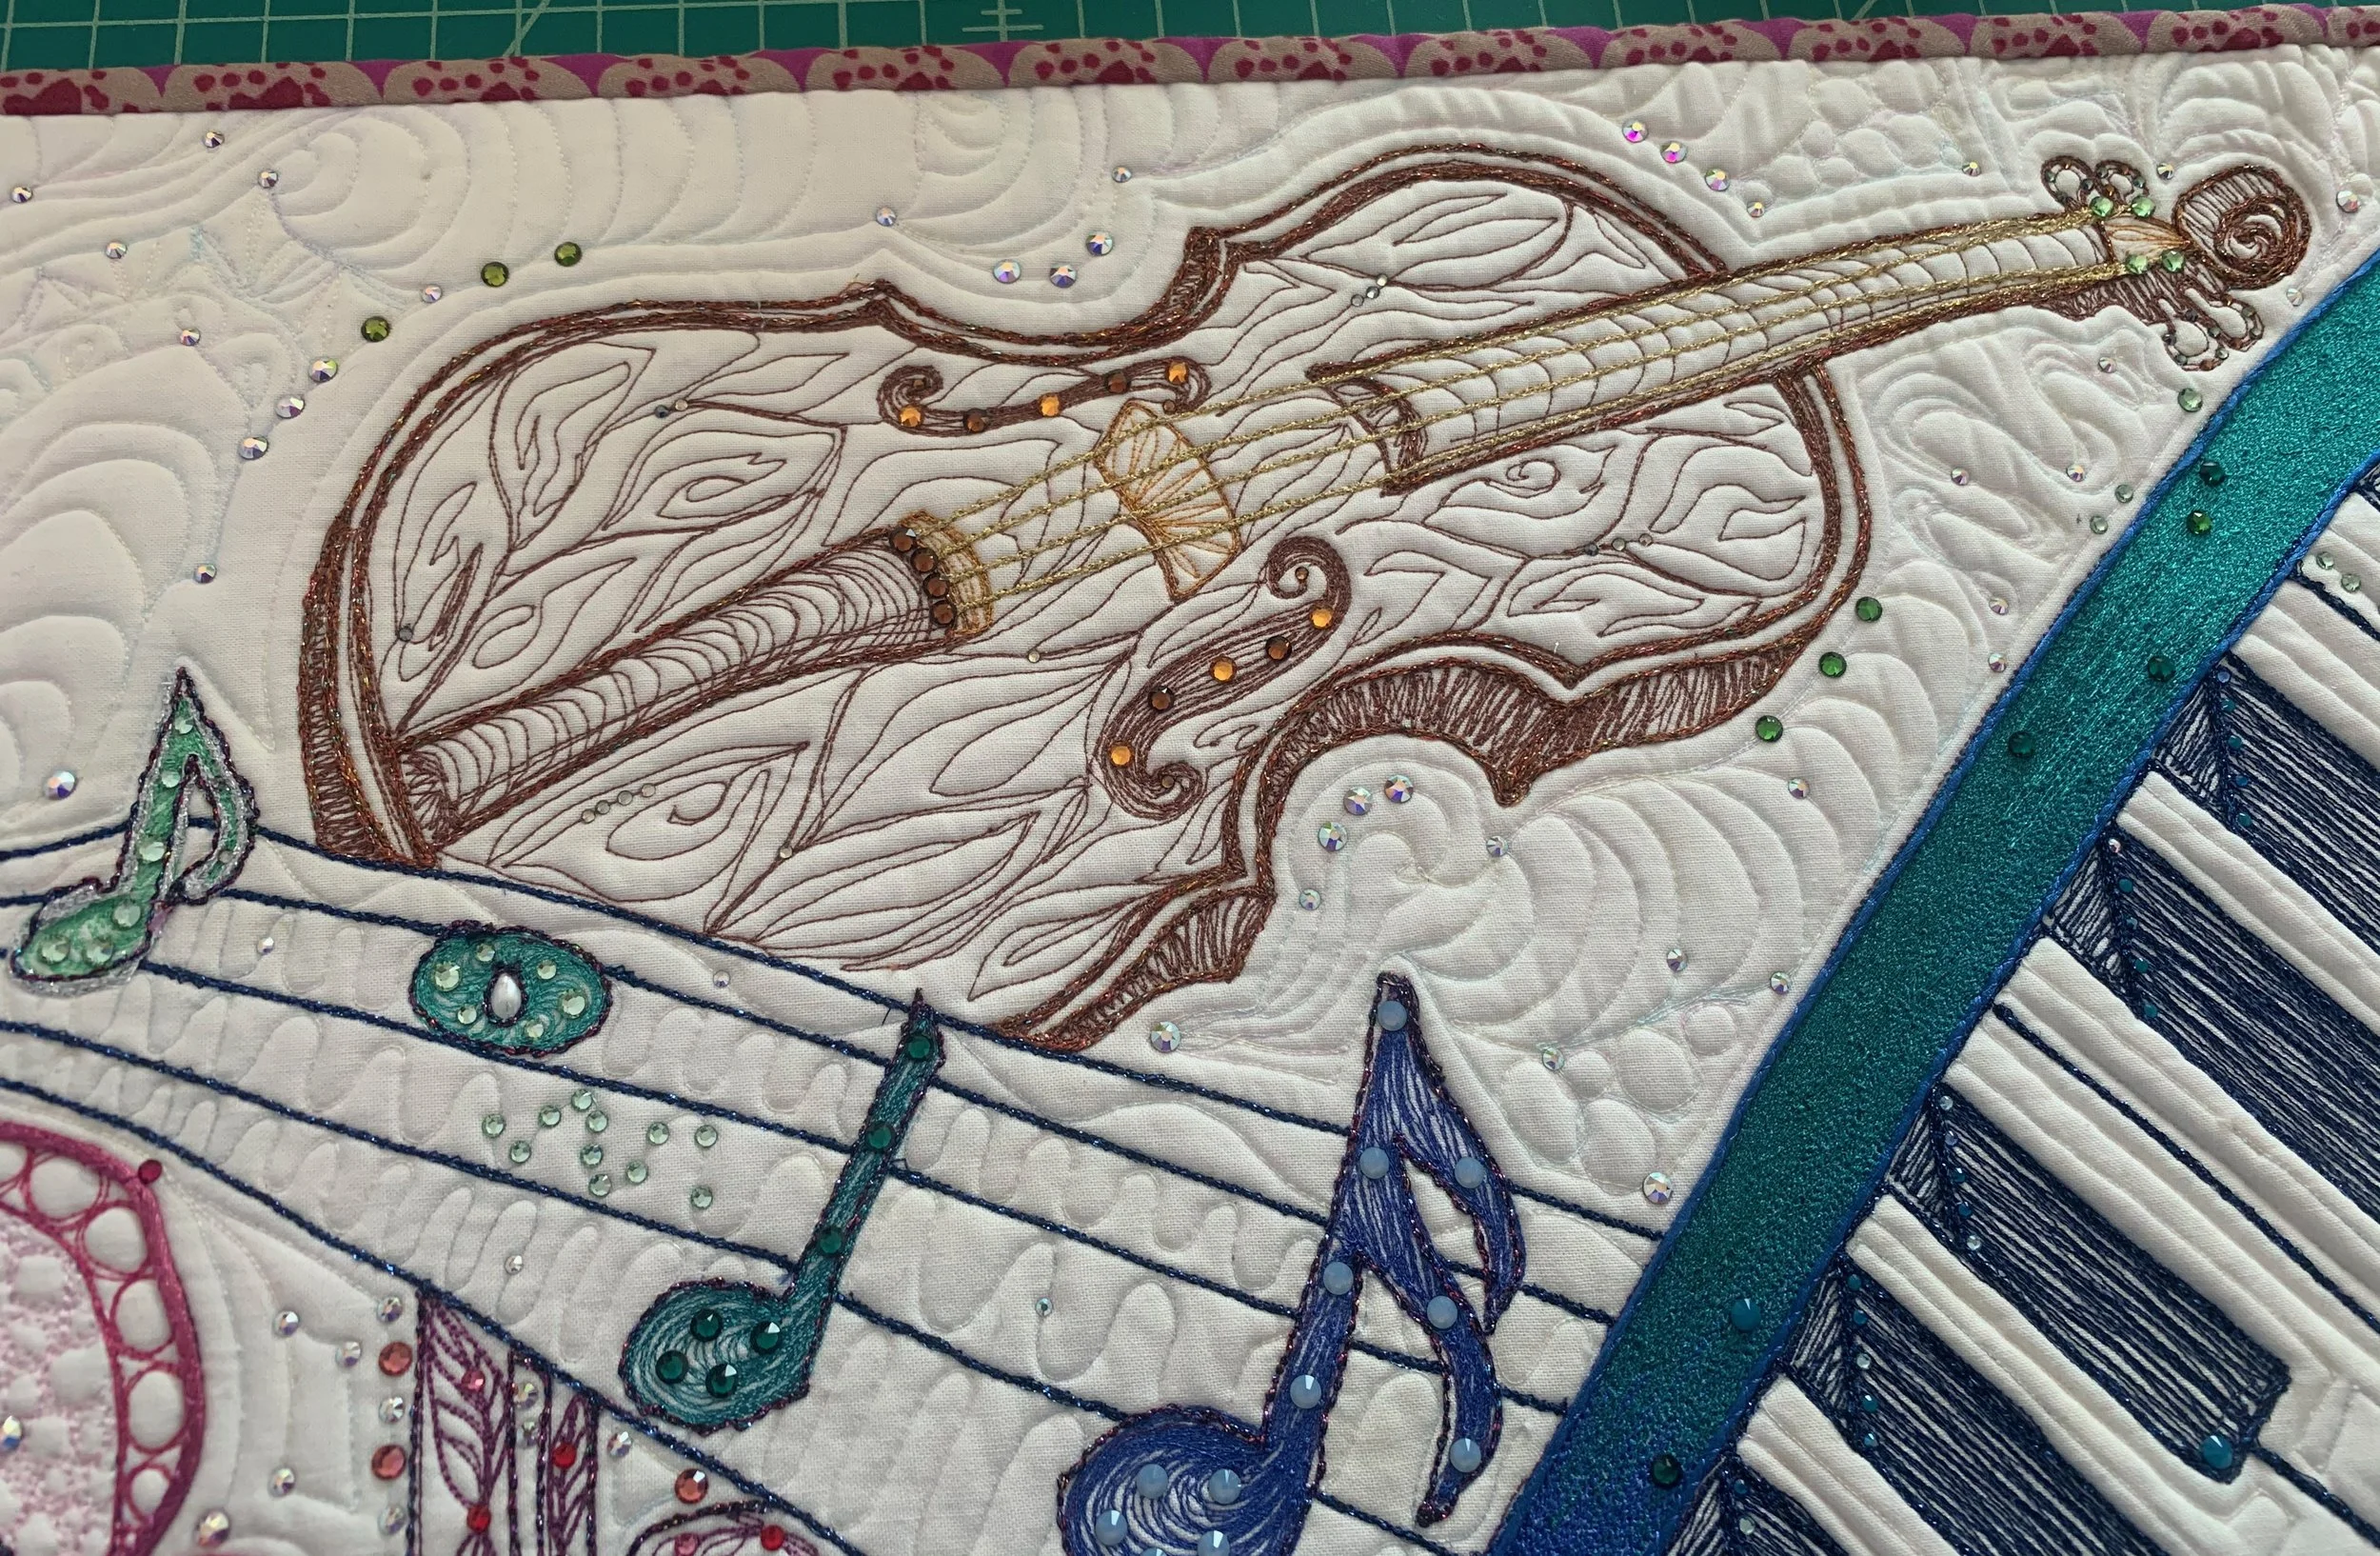
In this photo you can see I applied the heavy gold thread like cording instead of as bobbin-work.
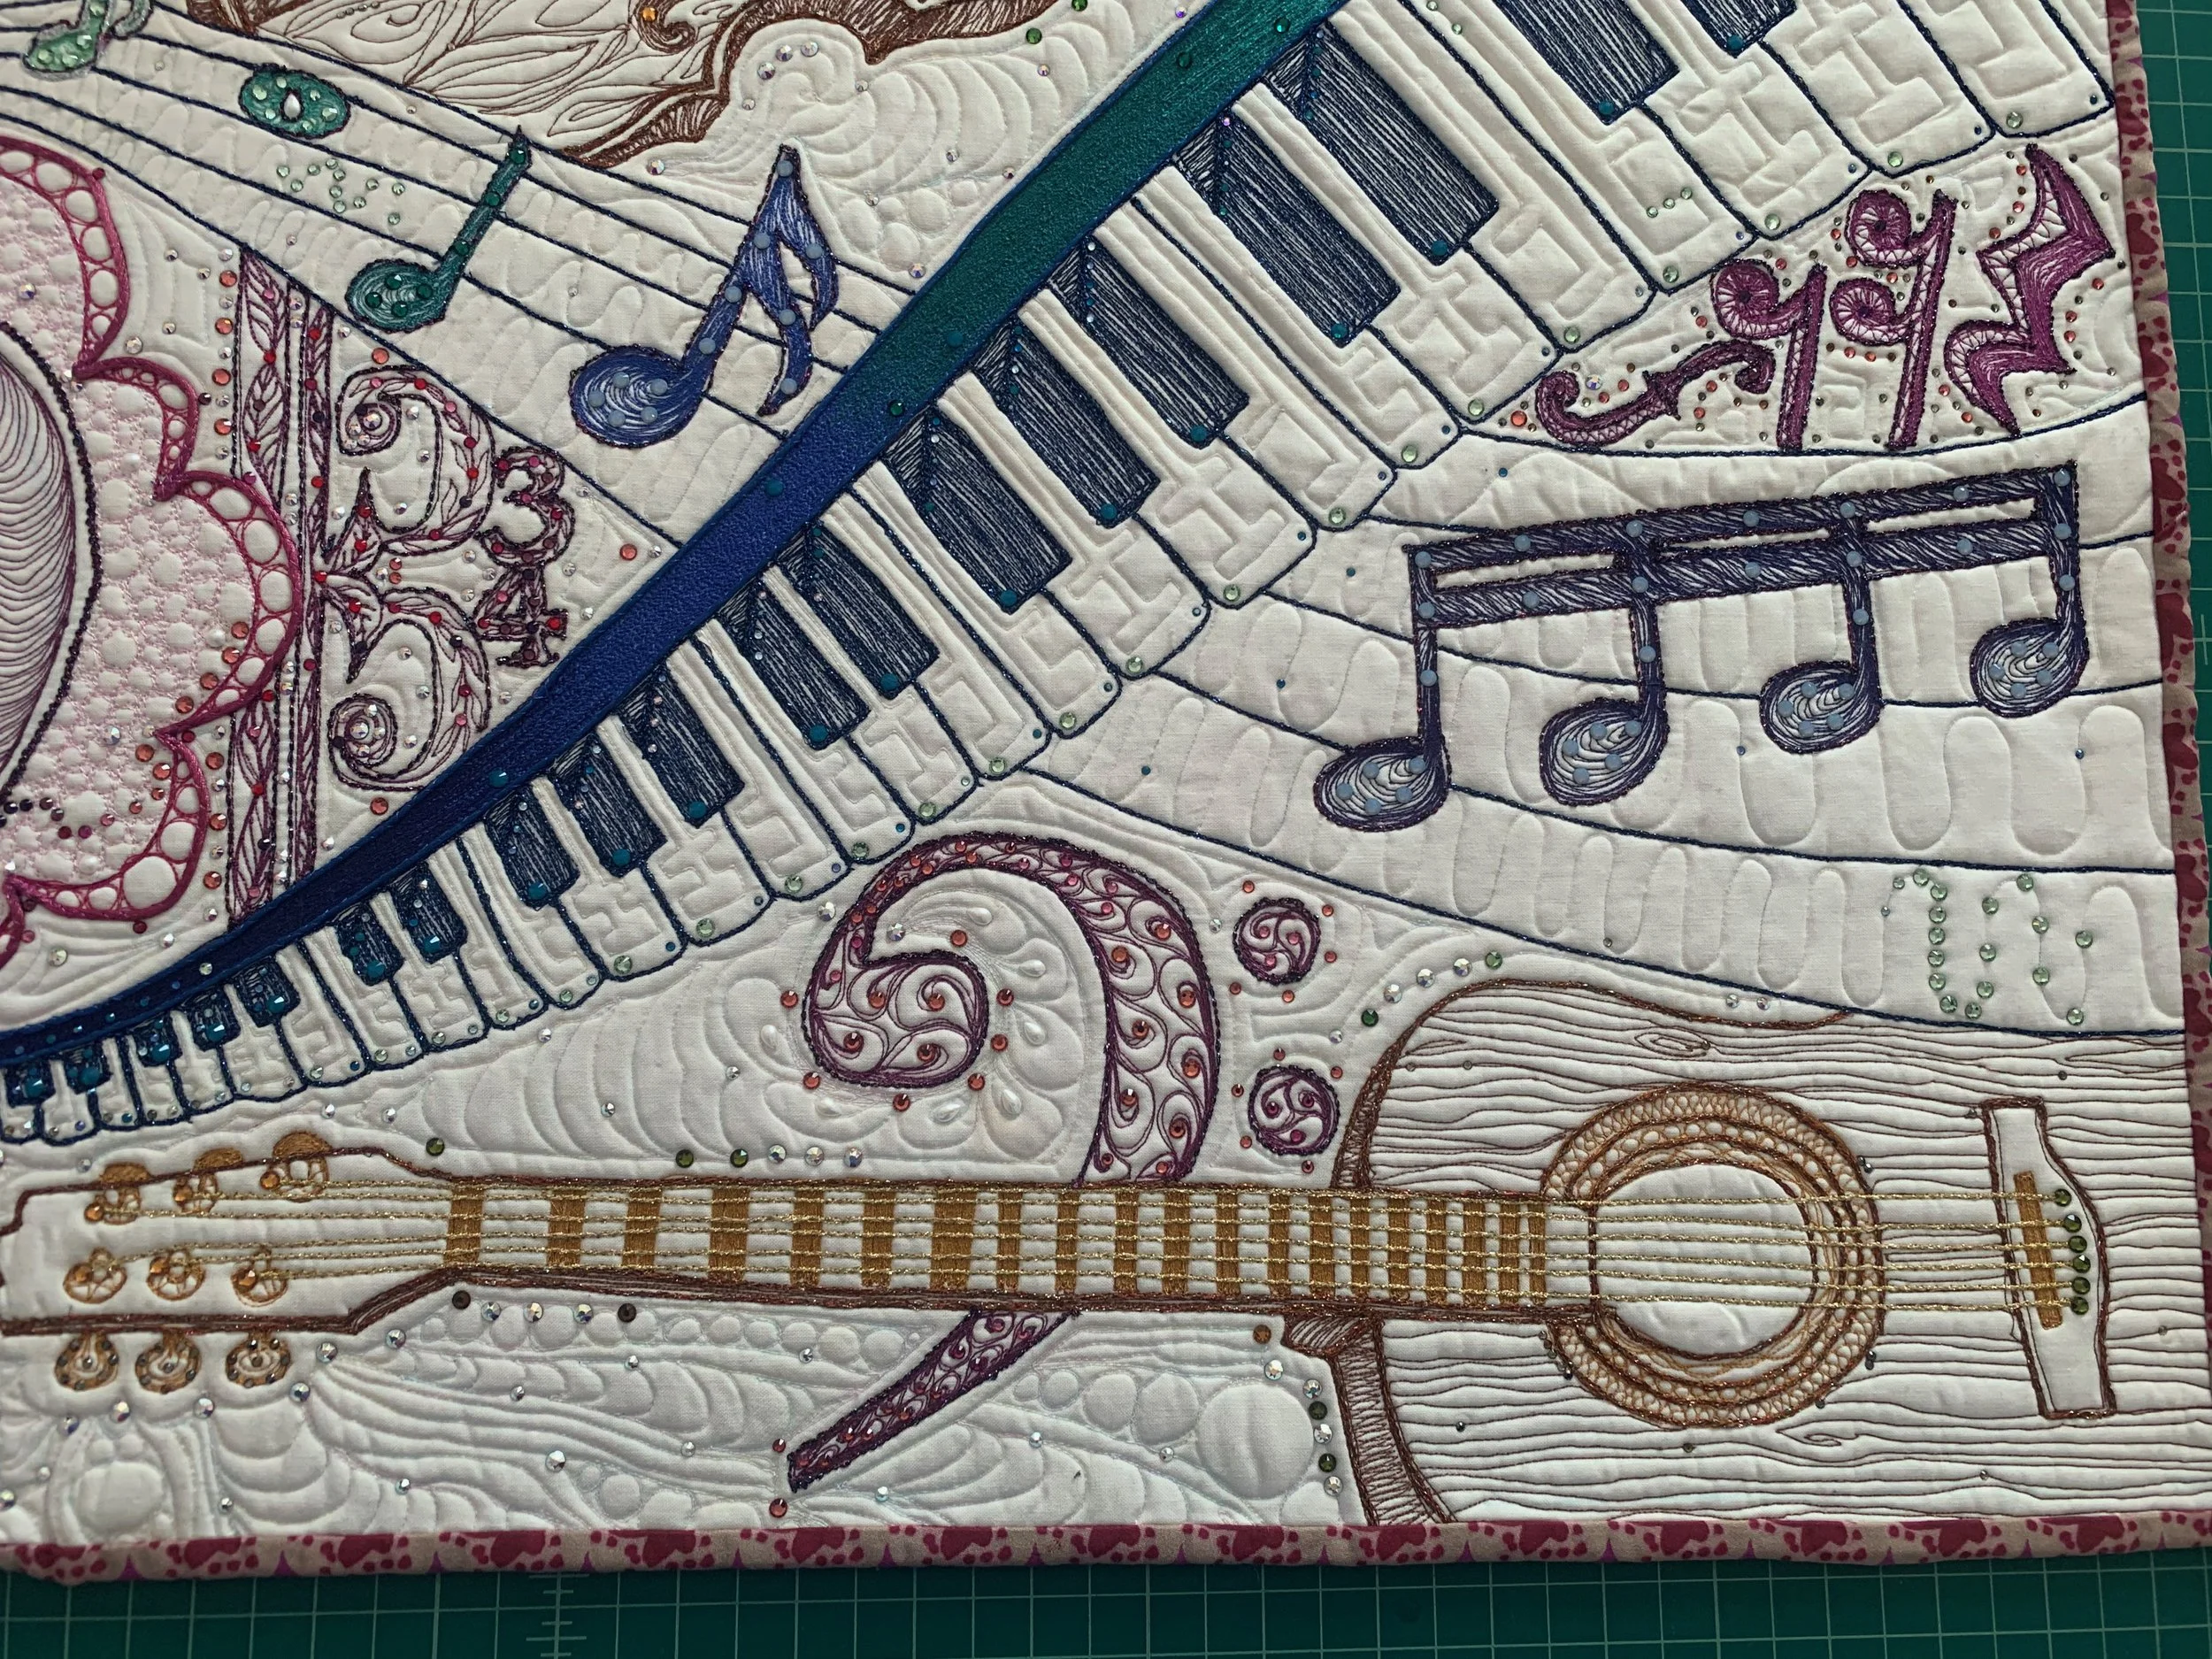
You can see here how much fun it is to play with different decorative techniques! (The binding fabric I used here is one of my first fabric designs years ago from my Spoonflower shop.)
Karlee teaches on a longarm quilt machine, but I used my large domestic Bernina sewing machine and I tried out some different specialty presser feet for the stitchwork.
For the initial outlining I used both an edgestitch foot and a clear-soled appliqué foot. I found that it was easier for me to just use the edgestitch foot and turn my quilt a lot to get my lines. This wouldn’t work so well on a larger quilt, but for this small one and one my big sewing machine, it worked.
I tried out a clear-soled free motion couching foot for the couching, as well as the clear-soled appliqué foot. I liked the appliqué foot best for this, and again this probably wouldn’t work on a really big quilt. Because I’m so comfortable with regular sewing, I just ended up preferring the control I had with the non-free motion feet for some of these steps in which I was trying to be more precise.
When I needed to do the free-motion quilting, however, the free-motion feet were necessary! I used my stitch regulator foot with the clear sole and the machine’s feed dogs down. Because the stitch regular foot is basically a little computerized accessory, it does most of the hard work for you, and your task is to learn to steer. It saves a lot of energy and is helpful in avoiding a flare-up of an old hand injury.
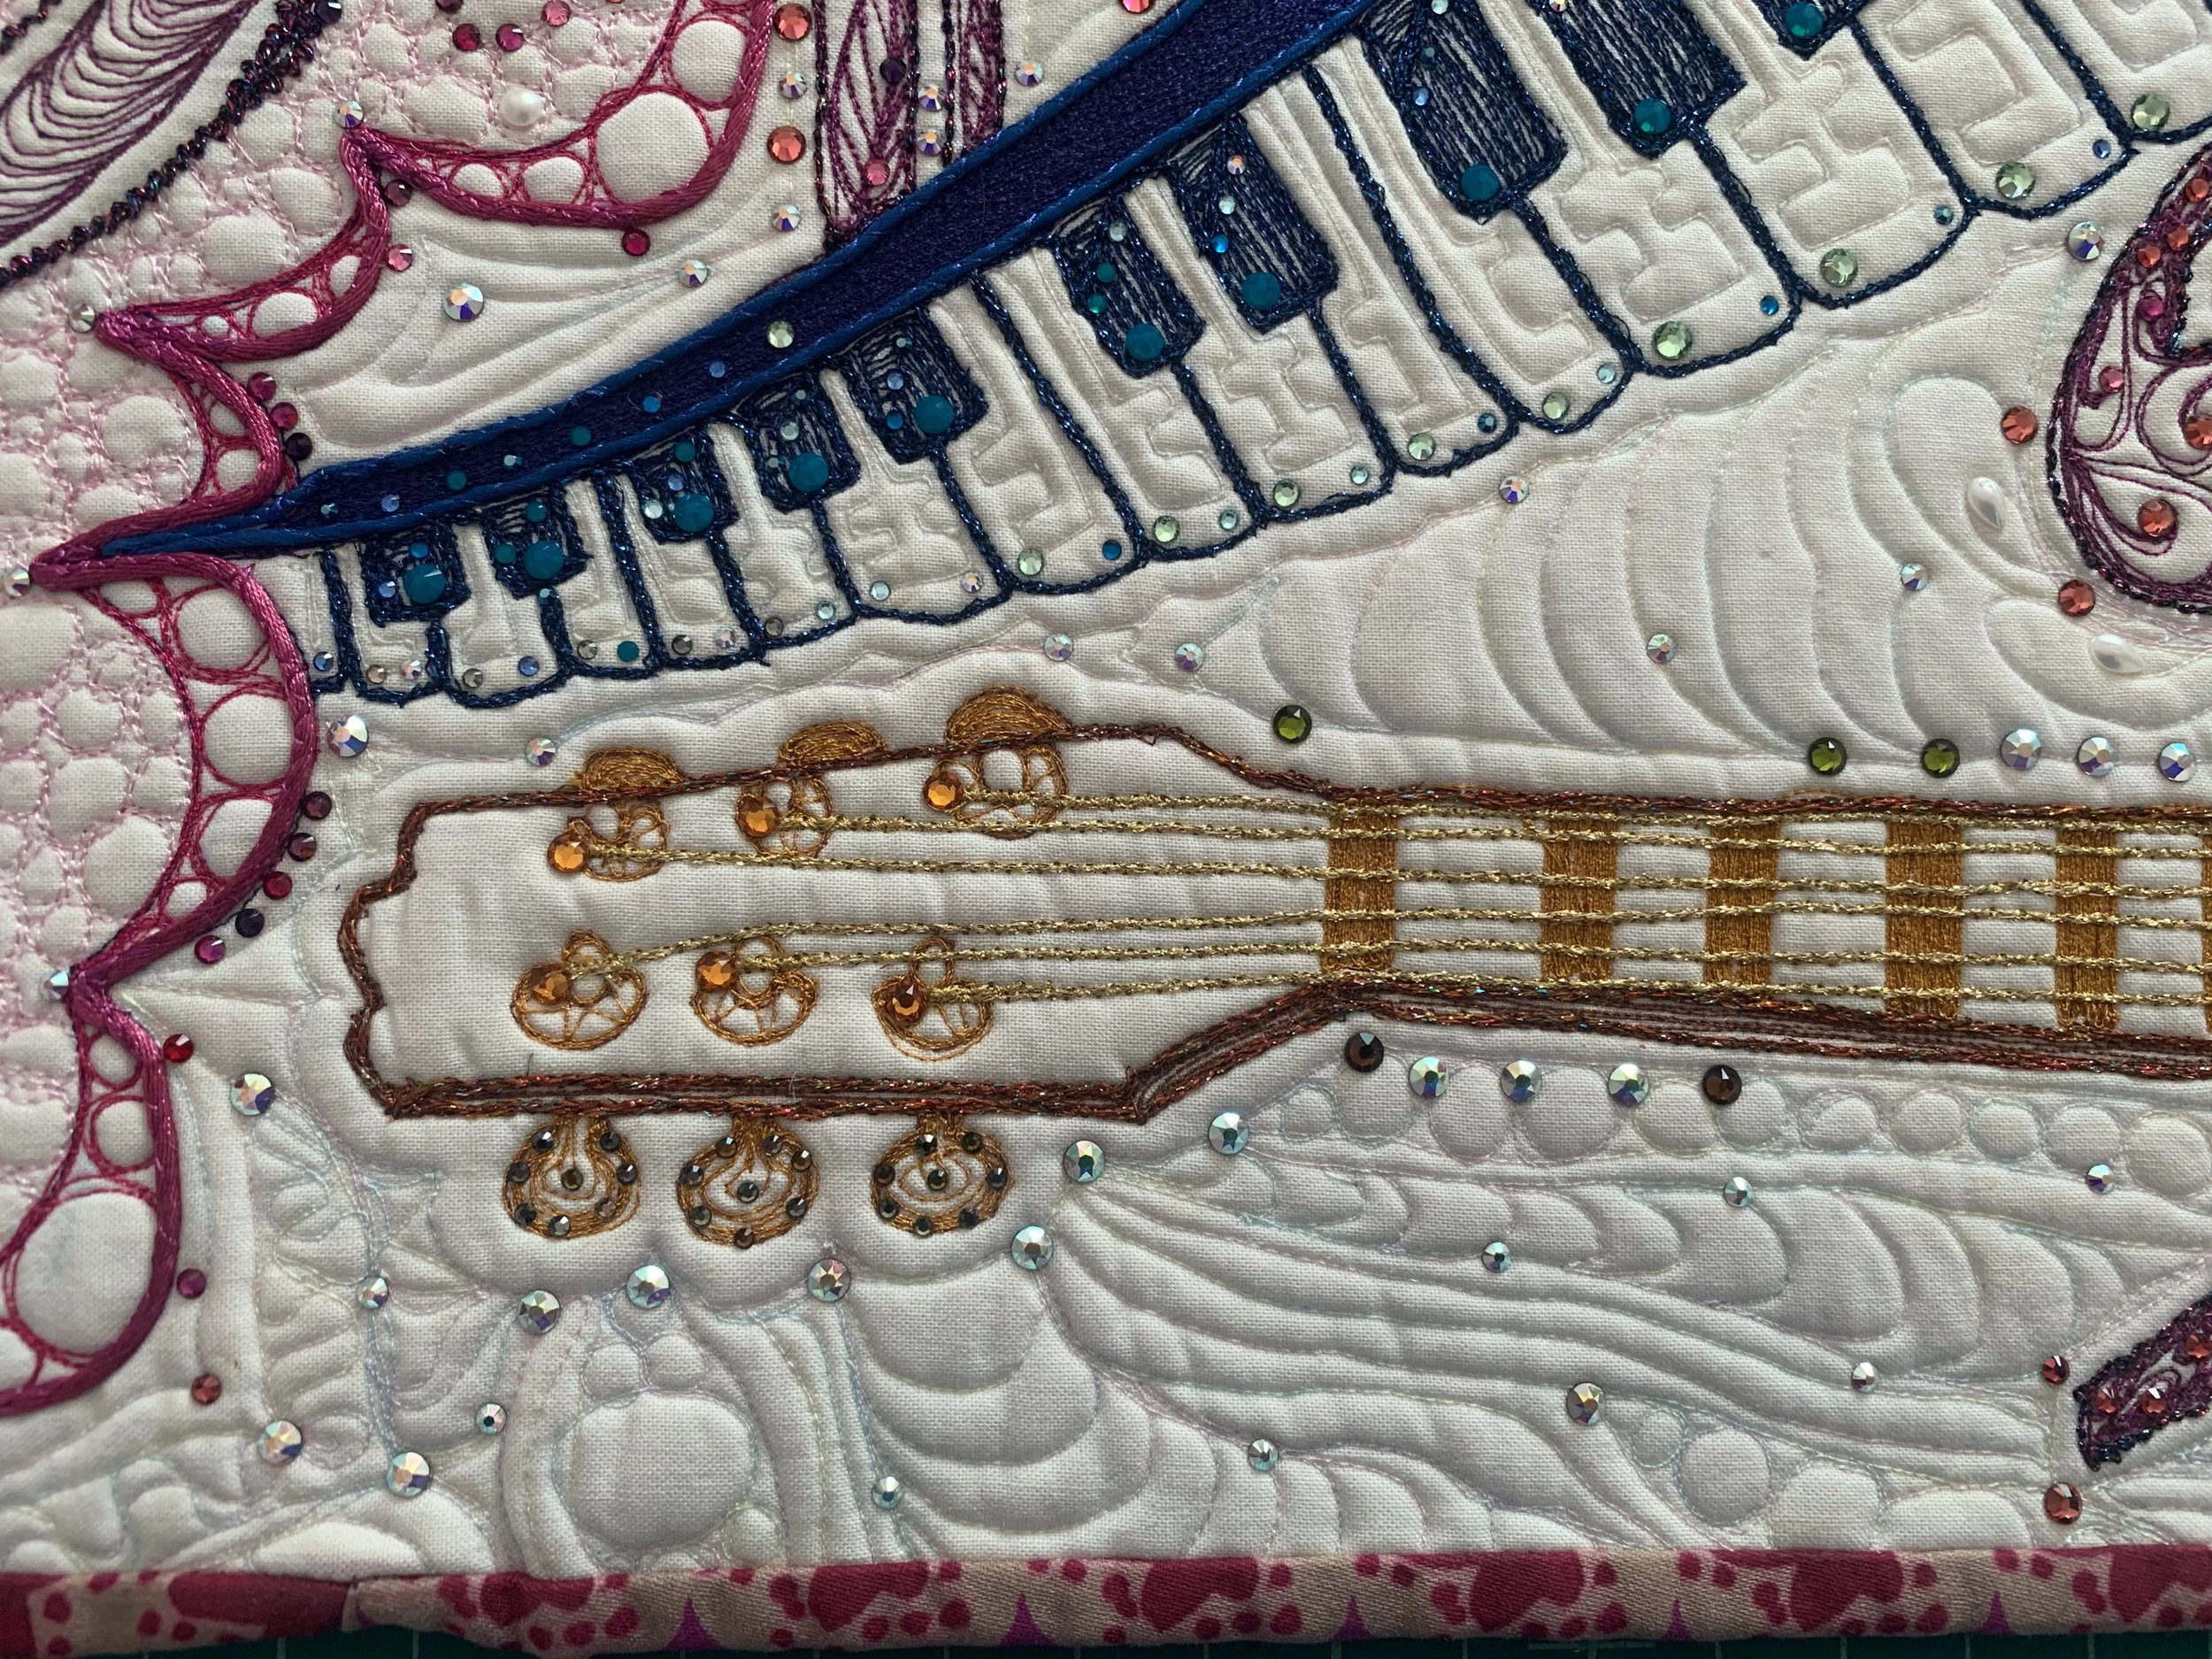
Compare the more precise lines of the instruments versus the free motion quilt stitching in the background.
Epilogue
I can say wholeheartedly that I had so much fun learning all these new decorative techniques in this Shimmering Symphony Master Class! Karlee is a great teacher, and I appreciate how she shared her art with us to copy so we could end up with something worth displaying in our own homes. If you are interested in learning from Karlee Porter, definitely check out her website and pick up one of her books or even better, sign up for one of her classes. Taking her classes has ended up being a true investment in advancing my fabric art skills.